Quitabug Handmades- Home
Shop Now
Order 24/7
Join my Team
Paper Pumpkin
Classes and Events
Videos and Projects
Videos
Image Map

Saturday, October 28, 2023

Trick or Treat Book Box


Hey there! Happy Saturday! I enjoyed bringing you a project on Saturday a few weeks ago for WCMD, so I decided I might possibly make this a regular thing in the future.

I'm super excited about today's project!! It's something I've never made before, a book box. I had the idea because of my Murder She Wrote book club! I have a best friend in North Carolina who I do this weekly book club with and we had chosen this particular book for October because of it's Halloween theme. However, we haven't finished our last book so...looks like we won't start this one until November. I wanted to send her the book as a gift and I of course needed some cute packaging. I love that I can make my own gift boxes using Stampin' Up! products! In today's tutorial I share some tips on how I come up with measurements for custom boxes.

Host Code- GWWNZADV
Click the button below to shop.

Watch the video tutorial below for step by step instructions or CLICK HERE.


Box lid and base 6.5" x 9" scored at 1" on all 4 sides (see video for special tip scoring the base of the box)
Basic Black cardstock 3.75" x 6.25"
Them Bones DSP 3.5" x 6"


NOTE: If viewing this blog post from an email, CLICK HERE to view with full supply list.

Happening Now
♥ Shop Stampin' Up! HERE
♥ October Customer Order Gift HERE
♥ Sign Up for my Weekly Newsletter HERE
♥ Join My Team of Quitabug Stampers HERE
♥ Subscribe to Paper Pumpkin HERE

Shop Now Join my Team Paper Pumpkin Image Map

Monday, October 16, 2023

More Wishes Card Kit w/ $50 Purchase


Hey there! I'm excited to introduce my October card kit featuring the More Wishes Stamp Set. I love this sentiment stamp set because you can combine large font with script phrases and create a layered look. I think this stamp set paired so well with the Merry Bold & Bright Designer Series Paper.

Host Code- GWWNZADV
Click the button below to shop.

Watch the video tutorial below for instructions on completing this kit or CLICK HERE.


How to get your FREE card kit:
  1. Simply place a minimum $40 order (before tax/shipping) in my Online Store.
  2. Be sure to use the Host Code at checkout-  Host Code- GWWNZADV
  3. You must order between October 1 - 31 in order to receive this card kit. 
What's included in your kit:
  • Consumable supplies to make 1 each of 3 different cards. Envelopes included. No stamped images in kit.
  • Color PDF with measurements.
Shipping Dates:
  • Kits will ship each Friday through November 3rd. 
------------------------------------------------

You also have to option to purchase my monthly card kits if you prefer (US only). 
Cost: $15.98 (includes shipping w/ tracking)


Recommended Supplies Shown Below:
Remember: You can purchase whatever you would like to receive this free card kit, these are just suggested supplies to complete each card exactly as I have.

Happening Now
♥ Shop Stampin' Up! HERE
♥ Sign Up for my Weekly Newsletter HERE
♥ Join My Team of Quitabug Stampers HERE
♥ Subscribe to Paper Pumpkin HERE

Shop Now Join my Team Paper Pumpkin Image Map

Tuesday, October 10, 2023

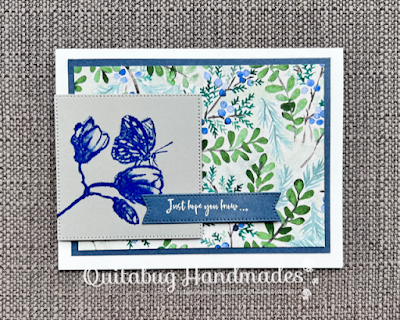
Just So You Know...|October Customer Appreciation Gifts


Hey there! I'm so excited to share my October customer "thank you" cards and gift envelopes. It means so much to me when you choose to shop with me and every order matters, no matter the amount! Giving these handmade cards and mini gift envelopes is just one way for me to say thank you for your support of my crafty little Stampin' Up! business. ❤️

Host Code- GWWNZADV
Click the button below to shop.

Watch the video tutorial below for instructions on how to create this card or CLICK HERE.


Basic White Thick card base 5.5" x 8.5" scored at 4.25"
Misty Moonlight layer 3.75" x 5"
Winter Meadow DSP 3.5" x 4.75"


*The cards are blank on the inside for you to write your own message and send them to someone special. The mini envelopes contain a crafty fall themed gift.*

NOTE: If viewing this blog post from an email, CLICK HERE to view with full supply list.
Happening Now
♥ Shop Stampin' Up! HERE
♥ Sign Up for my Weekly Newsletter HERE
♥ Join My Team of Quitabug Stampers HERE
♥ Subscribe to Paper Pumpkin HERE

Shop Now Join my Team Paper Pumpkin Image Map

Saturday, October 7, 2023

Heartfelt Hexagon Patchwork Card| World Card Making Day 2023


HAPPY WORLD CARD MAKING DAY! ❤️
I love that there's a day to celebrate the papercrafting art of cardmaking! So awesome! I wanted to share a card idea with you today that I feel really captures the fun of cardmaking. I came up with a cute and eclectic patchwork card (well...that's what I'm calling it). I used the new all-occasion Heartfelt Hexagon Bundle and paired it with pretty patterns from the Delightfully Eclectic Designer Series Paper. I absolutely love how this card turned out!

Host Code- GWWNZADV
Click the button below to shop.

Watch the video tutorial below for step by step instructions on how I created this cute patchwork card or CLICK HERE.


Night of Navy card base 4.25" x 11" scored at 5.5"
Fresh Freesia cardstock 4-1/8" x 5-3/8"
Delightfully Eclectic DSP- two pieces cut at 2" x 5.25"- cut each piece randomly into two smaller pieces, flip the reverse side of each pattern over so you now have 4 different patterns for your patchwork card, adhere each piece into place (see video)


NOTE: If viewing this blog post from an email, CLICK HERE to view with full supply list.
Happening Now
♥ Shop Stampin' Up! HERE
♥ Sign Up for my Weekly Newsletter HERE
♥ Join My Team of Quitabug Stampers HERE
♥ Subscribe to Paper Pumpkin HERE

Shop Now Join my Team Paper Pumpkin Image Map

Thursday, October 5, 2023

September 2023 Paper Pumpkin Alternates| With Love & Gratitude


Hey there! I wanted to share a couple of cute alternate ideas with you featuring the September 2023 With Love & Gratitude Paper Pumpkin Kit. This kit was beautifully designed with autumn in mind and features elegant gourds and pumpkins, traditional fall colors, and specialty gold foil accents.

Host Code- GWWNZADV
Click the button below to shop.

Watch the video tutorial below for step by step instructions on how I created these alternate projects or CLICK HERE.


Card Measurements
Lost Lagoon card base 4.25" x 11" scored at 5.5"
Basic White cardstock (inside) 4" x 5.25"
Designer Paper (cut from inside mini envelope) 1-7/8" x 3-7/8"
Designer Paper strip (cut from gift bag) 1/2" x 4.25"

Gift Bag Measurements
Take the flattened gift bag, flip it over to the back, and line up the top left corner with 4.25" on your Paper Trimmer then cut off the bottom portion of the bag. Slide your bag to the 1" inch mark on the far righthand side of your trimmer and score the bottom of the bag. Cut up each fold mark (four total) on the bottom of the bag until you reach the 1" score line we just created. Once done, you should now have four flaps on the bottom of the bag.

If you're interested in subscribing monthly to Paper Pumpkin with me, click the red "Subscribe Here" button or purchase one of the pre-paid options below.


NOTE: If viewing this blog post from an email, CLICK HERE to view with full supply list.


Happening Now
♥ Shop Stampin' Up! HERE
♥ Sign Up for my Weekly Newsletter HERE
♥ Join My Team of Quitabug Stampers HERE
♥ Subscribe to Paper Pumpkin HERE

Shop Now Join my Team Paper Pumpkin Image Map